PLYCYCLE

Take a look at the finished bicycle here.. www.plycycle.co.uk

Friday, 29 April 2011

I started again. Wooden bike frame MK2

I did it, I started again. The wooden bike frame had got to a point where I had to make a decision, as I explained in the last build post. It just didnt feel right. So I umm'd and arr'd and eventually I jumped into my van and went to a new ply wood supplier. Avon plywood. They were brilliant. I talked it over with the man there and we decided that I should go with Birch ply, my original plan. I bought a sheet of 12mm birch ply and set to work.
Having done it once the second attempt at the wooden bike frame came together much faster. In a couple of hours I was back to the same place as the first frame.

Work in progress.
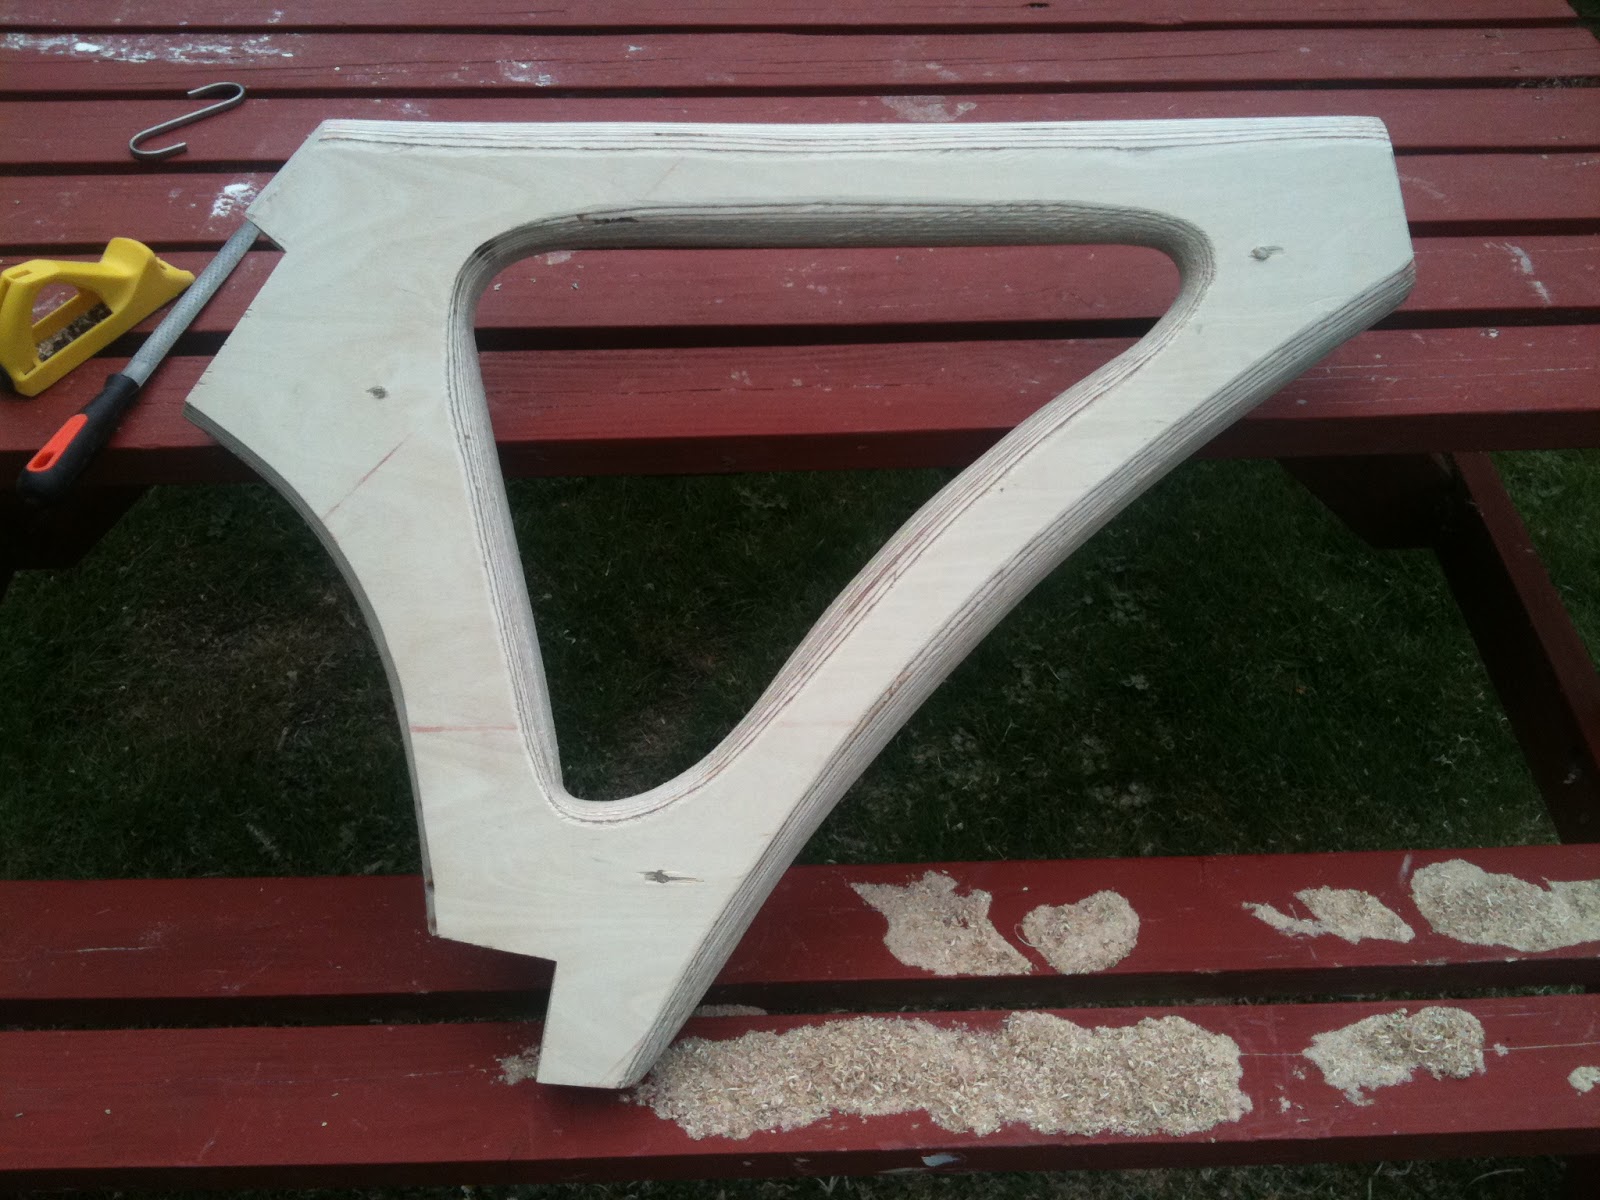

I took the opportunity to make an amendment, I noticed that there was possibly not enough space for the seat post to slot in and maintain enough strength, so I extended this in the new frame.
The first most striking difference apart from being much lighter in colour, is that bitch ply has many more possibly twice as many laminate layers as the hard wood ply in the same cross section, this gives it a very different feel. The birch is also easier to work on. The look as the curves are worked in is much more striking (see the video) and I have a much better feeling about this build. 

Old frame MK1 darker - New frame MK2 lighter.


The main reason for loosing confidence in the last frame was the amount of air gaps between the laminate layers. Looking this over with the fella from Avon ply, he thought it was just bad luck on my first sheet of 25mm hard wood ply. However, the new wood has no voids yet. This gives me renewed confidence, as I was hatching all sorts of plans to inject epoxy resin into the voids in the MK1 frame.

Just seen this has uploaded sideways, sent from my phone, didn't check it, didn't keep it, that'll teach me.

As you can see in the vid, I have now got four layers of ply wood in the frame. This will mean two extra fixings of epoxy, but will make the cutting out of the middle two layers for weight reduction much easier as I would have had to use a router on MK1. I can just use a large hole cutter on the two matching middle sections.

I am really glad I started again, I feel much happier about it now, even if I have had to spend on a new sheet of ply. I learnt a lot on MK1 and know that MK2 will be better.

Tuesday, 26 April 2011

Rear hub...

So, I said back in the beginning that this would be a fixed gear bike, and so it probably will be. But my attention has been drawn to an amazing hub gear from Sturmey Archer. It is a two speed kick change back pedal brake hub. Yes a bit of a mouth full but its amazing. No cables! Just kick back to change between the two gears. There is a free wheel, but put in a back pedal and it is a traditional American style brake. I love the fact that it will need no cabling. It is £70 for the hub only, which as nice hubs go is not that much, but in truth is probably more than I want to spend on this project right now.

It would be nice though.

A bit of frame shaping.

Wit a few hours sneaked in over the last week end I managed to start roughly shaping the wooden bike frame. It is very early in the process and I have cut the frame over large so that I can work it back quite a way while finding a shape I like. The first steps were promising, as the lines that the laminated layers of the ply wood give as it is shaped look just how I had hoped they would.


The only thing is that the more I work with this hard wood ply that I have bought, the less confident I am in it. I think it is too brittle. I may have to use this frame as a test. I have been mulling it over and four layers of 12mm marine birch marine ply would do it. Going for the 12mm, would make it affordable, rather than the 25mm that I went for here. Part of the problem is that the ply I bought wasn't marine grade, and the gaps in lamination are just too frequent and I think the weak spots it makes are just too much.


I suppose I knew this strength issue when I started, but thought I could get by it with careful cutting and some epoxy resin. It may well work, but I am bracing myself for a restart.

On a more technical note, I bought a 40mm hole cutter for the bottom bracket placement. Drilled the hole and it fits perfectly. Big smile. I will now get together with the mechanical engineer at work who has kindly offered to help me out a bit with the metal fabrication work around the bottom bracket and head tube.

However, I have really enjoyed the basic shaping I have done this weekend, it has been the first time the frame has started to have a real feel about it in the way I saw in my head back along. I wont mind if I have to do it again as I love the process.

Saturday, 16 April 2011

Cutting the frame....

So I did it I took the saw to my quite expensive piece of ply wood. It is the bit I have been looking forward to the most in this whole wooden bike building project. The first cut. I used the card board templates to mark out and just got stuck in. As it turns out I have enough ply for a second attempt if I make a boo boo on this first attempt.


I cut two pieces from the same template, which are now mostly the same shape. Next I need to temporarily fix them together so that I can shape them to be exactly the same shape. This will also include detailing and trimming to reduce weight.


I also marked out a rough template for the rear stays, but they are not cut out yet, the video shows the two parts of the frame, cut and lying together.

I have decided to use West Systems Epoxy in my build. It looks like it will do everything I need. Most of all they put out a really great info booklet and DVD to help first timer like me. The main place the epoxy will be used is to join my two halfs of the frame and probably to reinforce internal sections I router out for weight saving.

Monday, 11 April 2011

Frame template.

So with a big sheet of ply staring at me I wanted to jump right in and start sawing. However, being on a tight budget, I decided to take the advice of Micheal and Jeff, and start making a card board template. So I made one, and laid it up on my 1981 Ralliegh fixie (which I love the frame geometry of ) to see how it worked.


Not too bad was the answer, but there were some tweaks to be made, so I drew out and cut another.


Its laid out a bit squiffy here in the pic but it does actually fit cleanly. The thich section infront of the rear wheel is the biggest change, and I like the first template, but for strenght i will go this way first and can cut the section out later if it looks like the strenght is there. You can also see that i laid in a couple of scraps of ply to see what the rear stays might look like.
  
I am worried that they will not be strong enough, even with the main frame hugging the wheel line. So I am looking at extending the rear drop out frame to go furthur up the stay and hope fully reienforce the stay.
It may look something like this. I did some snap tests with a lenght of the new ply wood the correct lenght and width for the stay. On its own it beaks with relativly little force, doubled up (one for each side) the strengh is obviously double but felt much better to me. Add to this the strength of a triangle shape when bolted into position with a wheel and the drop out extention ( to reduce the leverage) and a two part epoxy resin top coat and I think it will be ok. Only one way to find out.

Other bits to arive last week were the crank set and bottom braket, thanks to Charlie the bike monger, great for bits n pieces. so with most of the hard wear now on the bench, I can relly start measuring up.

I've got wood.... plywood.

So I finally made it to the wood shop to investgate ply wood for my bike. Robbins timber, in south bristol are set up to supply the boat building and mending trade, so have a very good stock of hard wood and marine ply. I was only going to have a look, but one thing led to another and I came home with a half sheet of building grade 25mm hard wood ply. It is less than half the price of marine grade which has no air gaps between laminate layers, this does have strctural / strenght implications, but for my prototype I will be fine using this for the frame, rear stay, well i am not so sure.

The lovely lovely timber yard.

My new piece of 25mm hardwood ply in the van.

Wednesday, 6 April 2011

Plywood shop.....

I missed out on a trip to the timber yard last weekend, so I hope that I can make it this Saturday. I cant make it in the week as it is too far for me to get to and back in a lunch hour on my bike. So, if I take our van I will hopefully be able to buy a sheet of the hard wood (birch) ply.
I have some time off over in a few weeks over Easter, and while this is mainly to spend time with my family over the Easter school holidays, I will be able to get some work done on the bike frame.

I think I will cut some rough template shapes from some card board (as suggested to me by Michael and Jeff who are building a wooden cargo bike, see a test ride vid on their blog) then get cutting for real.

Friday, 1 April 2011

More bits.

Ah ha ha haaa, a couple more bits arrived in the post. I have gone for a 1 inch head tube and fork set up. I had already bought the head tube section of tube ready for cutting down to size, so I needed to get a set of forks. I have to make this bike as economically as I can, so I have not gone for super light or posh branded components so far. I am not anticipating this bike to be light weight, but I hope it wont be cumbersomely heavy either. Anyway, I found a set of forks that will fit nicely and look nice. Being fairly cheap they are slightly chunky, but I think this will help with the inevitably slightly more chunky look the wood will have. Also a great thing about this set of forks is that the threaded section is over long and can be cut to size. Many of the budget forks have a pre determined thread length.


I bought the stem from Velo Solo a great web site supplying specialist parts for fixed gear bikes. It is a reforge of a very popular old Cinelli stem. I already have one on my classic 1980's Ralleigh fixie, it is a stylish looking stem, but best of all doesn't break the bank. I also have a new head set in the garage left over from my fixie conversion, I didn't use it as I chose to restore the original instead of going new.
So the bits and bobs are gathering, I want to get some wood next to do some testing.

Thursday, 24 March 2011

Wooden bike - in miniature.

It is not a great thing of beauty, but this model has really helped my see where this is going. I cobbled it together in lunch break at work and then shot it on a green screen set down in one of the studios, on my phone. Perhaps I should have spent more time on it and shot it with a proper camera, but really at this stage that is not the point. I really wanted to see the shape of the frame in 3D. I tacked a print out of the bike design onto some foam core card and set about cutting it out. The foam core is not quite to scale, too thin for the main frame and too thick for the rear stays, but it is good enough to get the idea. Oh yes and I used square section brass for the forks...... Remember, cobbled together.


I made the forks too long on the model and it really makes a huge difference to the intended design. The bike now looks unbalanced, squat at the back and lanky at the front. I dont think it is worth changing the model at this stage. I like the model and I think I may make another, proper scale version at some time in the future. 

Wednesday, 23 March 2011

Bike design progress.

I was just looking at the Renovo site in more detail and noticed that they have the curved frame line around the rear wheel to shorten the rear stays as I have proposed I'm my last design. I am quite pleased as it means that I am doing something right in my bike design process.
There can't be many bike shapes that have not already been put out there, especially in the standard frame geometry that I am following.
Yesterday I thought it would be a good idea to make a model of my wooden bike design. Just made out of foam core and bits and pieces, it will be near as possible a scale representation of the design below. It's nearly done, I will post pics when it's ready.

Friday, 18 March 2011

Plywood.

Today I started swatting up on plywood for the frame components of my wooden bike. I am lucky that in Bristol there are a couple of very good suppliers, who stock a variety of hard wood ply in most thickness's. I have based my design around 25mm ply, so that is a given, what is not so cut and dry is the wood base of the ply. The one I have my eye on is a 100% mahogany ply. The only problem with that is the cost, £168 per 8x4 sheet. Too much for a test project, maybe if the proof of concept bike works I can make another with the expensive wood. So the question is, what else is out there. Well the main wood in cheap ply is spruce, a soft wood, which although lighter, I have ruled out because I don't think it will be strong enough in the high stress parts of the frame in the longer term. So that leaves other hard wood options. The one that seems best, affordable and made to high standards is birch ply. It is the most commonly available high quality ply, both my local suppliers carry graded birch ply from rough and full of knots to architectural grade.  Best of all, birch ply usually comes from sustainable forestry, something that is harder to to be sure of with the more exotic hard woods. The really good stuff is about £45 a 8x4 sheet, I think this is what I will go for.

Thursday, 17 March 2011

The bottom bracket....

I had initially hoped that I could hide the bottom bracket mounting inside the wooden bike frame with a single metal tongue filleted between the two halfs of the plywood frame.  This may still be possible, but I am worried about the amount of torque that will have to go through this fixing, as it is one of the most mechanically stressed parts of the bike. My plan at the moment is to use a two metal mounts that sandwich the wooden frame. This will defiantly be stronger, but I also want to keep the metal work hidden as much as possible. If I can find a way of making this work then that would, of course be best. I had best get the sketch book out.